
Best car interior detailing brush for ac vents sounds like a tiny niche problem, until you notice that “mystery smell,” the visible gray dust on the slats, or the gritty airflow every time you turn the fan on. The right brush doesn’t just make vents look cleaner, it helps you clean them faster and with less risk of scuffing soft plastics.
Most people get stuck in one of two places: they pick a brush that’s too stiff and leaves marks, or they pick something too soft that just pushes dust around. Vents are awkward, narrow, and often coated with a slightly sticky film, so tool choice matters more than you’d think.

This guide helps you choose a vent-safe brush, match it to your interior materials, and use it with a simple process that actually removes grime. I’ll also call out common buying traps, because “premium” on a listing doesn’t mean it belongs anywhere near piano-black trim.
What makes a vent brush “the best” in real use
For AC vents, “best” usually means effective in tight gaps and safe on delicate surfaces. The brush also has to feel controllable, because you’re working close to screens, trim edges, and sometimes fragile vent fins.
- Soft-to-medium bristles: Soft enough to avoid micro-scratches, firm enough to flick dust out of corners.
- Thin profile or tapered head: Lets you reach between slats without forcing the vent open.
- Good bristle retention: Cheap brushes shed and leave hair behind, which is a special kind of annoying in vents.
- Comfortable handle: Small area work causes hand fatigue, especially if you’re doing multiple vents and creases.
- Compatible with cleaners: Some bristles deform with harsh chemicals; a vent brush should tolerate mild APC or interior cleaner.
One more practical point: darker bristles hide grime, but they also hide when the brush is loaded with dust. Lighter bristles show contamination faster, which can be helpful if you’re trying not to smear dirt across trim.
Brush types compared (and when each makes sense)
If you search for the best car interior detailing brush for ac vents, you’ll see a few repeating styles. None is perfect for every vent design, so it’s worth knowing the trade-offs.
| Brush type | What it’s good at | Where it struggles | Who should buy |
|---|---|---|---|
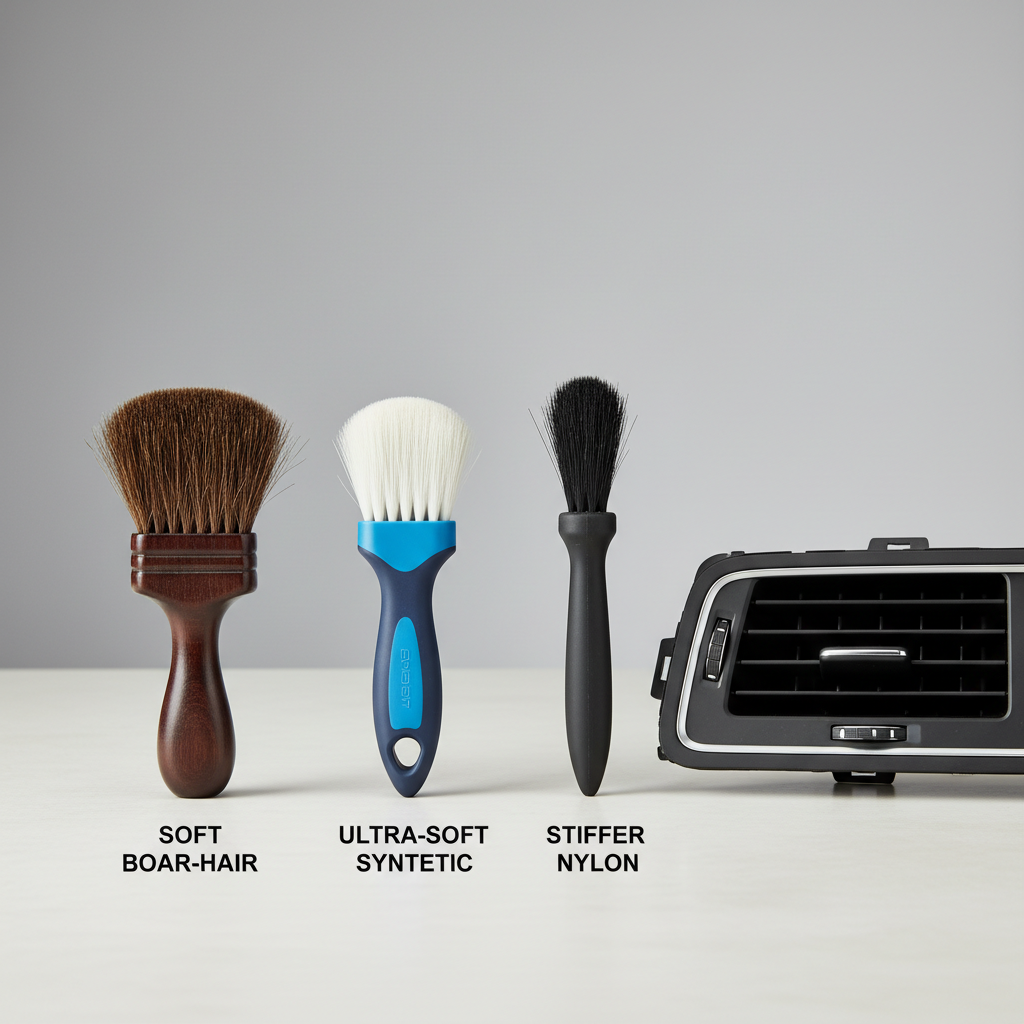
| Soft boar’s-hair style (or “boar-hair blend”) | General vent dusting, gentle agitation on plastics | Sticky buildup if bristles are too soft | Most daily drivers |
| Ultra-soft synthetic detailing brush | Piano-black, glossy trim, infotainment surround | May not lift stubborn grime in vent corners | Newer cars with delicate finishes |
| Stiffer nylon brush | Textured plastics, heavy dust packed into louvers | Higher scratch risk on shiny surfaces | Older interiors, work trucks |
| Vent “sponge” or foam stick tool | Wiping slat faces, grabbing fine dust | Hard to clean tool, can snag on sharp edges | People who hate brushing |
If you’re only buying one brush, a soft-to-medium brush with a tapered head is the safest all-rounder. If your car has lots of glossy black trim around the vents, add an ultra-soft synthetic brush and keep it “clean-only” so it never touches gritty areas.
A quick self-check: which brush do you actually need?
Before you buy, look at your vents and answer these. This avoids spending money on a brush that’s wrong for your interior.
- Do you have piano-black or glossy trim near vents? If yes, lean ultra-soft and use light pressure.
- Are your vent slats tight and thin? If yes, prioritize a narrow/tapered head over a big fluffy brush.
- Is the dirt dry dust or sticky film? Dry dust responds to brushing + vacuum; film usually needs a mild cleaner.
- Do you notice vent fins flex easily? If yes, avoid stiff bristles and aggressive scrubbing.
- Do you detail often? Frequent light cleaning favors softer brushes; infrequent deep cleaning may justify a second, firmer brush.
In many cars, the “right answer” ends up being two brushes: one ultra-soft for delicate areas, one general-purpose brush for vents, seams, and textured plastics.
How to clean AC vents without blowing dust everywhere (step-by-step)
A brush alone can turn vent dust into airborne confetti. The cleaner approach is to pull dust out while controlling where it goes.
Tools that make this easier
- Detailing brush (your vent brush)
- Vacuum with a crevice tool or soft brush attachment
- Microfiber towel (two is better)
- Mild interior cleaner or diluted APC (spot test first)
Process
- Turn the fan off and set vent direction so you can access slats without forcing them.
- Vacuum first around the vent opening and seams, so you don’t drag grit across trim.
- Brush with the vacuum nearby, working one small section at a time. The goal is “agitate and capture,” not “flick and hope.”
- For sticky grime, lightly mist cleaner onto a microfiber (not directly into the vent), then brush, then wipe. This reduces the chance of overspray getting into electronics.
- Finish with a dry wipe on the vent face and surrounding trim to remove any remaining residue.

Key point: if you’re trying to remove odor or possible mold in the HVAC system, vent brushing is only surface-level. According to CDC, mold exposure can cause symptoms for some people, and sensitive individuals may want to consult a professional if they suspect significant growth. If there’s persistent musty smell, you may need HVAC-specific cleaning or service rather than more brushing.
Buying checklist: what to look for (and what to skip)
Listings can be vague, so you’re mostly judging by construction and intent. Here’s what tends to hold up in real detailing.
- Look for: flagged/tipped bristles (softer ends), dense but not stiff packs, solid ferrule, comfortable grip.
- Prefer: smaller brush sizes for vents, with a tapered profile that can “thread” between slats.
- Skip: sharp metal ferrules with exposed edges, super long bristles that flop and slap dust, bargain packs that shed.
- Nice-to-have: color-coding or multiple brushes so you can keep one for delicate trim only.
If a brand claims “scratch-free,” treat it like a goal, not a guarantee. Interior plastics vary a lot, and even soft brushes can mar a surface if the brush carries grit.
Common mistakes that make vents look worse
These are the vent-cleaning pitfalls that usually trigger “why does it still look dirty?”
- Brushing dry dust without vacuuming, then watching it settle back onto the dash 10 minutes later.
- Spraying cleaner directly into the vent, which can push liquid deeper and leave residue. In some situations it may also be unwise around electronics; when in doubt, use a towel-first method.
- Using one brush for everything, especially if it touches door jamb grime and then goes straight to glossy trim near the vents.
- Over-scrubbing vent fins, bending them out of alignment. Many fins are softer than they look.
- Ignoring the surrounding seam, where dust lines build up and make the vent still look “gray.”
The fix is usually boring: lighter pressure, cleaner brush, and a vacuum positioned close enough to catch what you dislodge.
When it’s worth getting professional help
If your issue is mostly visible dust, the right vent brush and a careful process go a long way. If you’re dealing with any of the cases below, a detailer or HVAC service may be a better use of time.
- Persistent musty odor that returns quickly after cleaning
- Allergy-like symptoms when the AC runs, especially if multiple people notice it
- Visible residue deep inside ducts you can’t reach without disassembly
- Unusual HVAC noises or weak airflow, which can indicate a mechanical issue
That’s not alarmist, just practical. Some problems sit behind the vent face, and brushing the front can’t address the cause.
Conclusion: a “best” vent brush is really a safe match for your trim
The best results usually come from pairing a soft, tapered detailing brush with a vacuum-first workflow, then using a microfiber with a mild cleaner only when film shows up. If you want one simple action today, clean your brush, position the vacuum at the vent, and do one vent slowly, you’ll immediately see whether your current tool is lifting dust or just relocating it.
If you’re shopping, pick a vent-friendly brush you can dedicate to interior-only work, and add an ultra-soft option if your car has glossy trim around the vents. That small choice tends to save time and prevent the “why did this scratch?” regret.
FAQ
- What bristle material is best for cleaning car AC vents?
Soft natural hair or ultra-soft synthetics often work well for vents because they agitate dust without being overly aggressive. If your vents are heavily textured and neglected, a slightly firmer synthetic may help, but you’ll want to be cautious near glossy trim. - Can a detailing brush scratch my dashboard or vent trim?
It can, especially if the brush picks up grit or if the bristles are stiffer than expected. A quick habit that helps is vacuuming first and reserving a “delicate surfaces” brush that never touches dirty jambs or floor plastics. - How do I keep dust from blowing back out of the vents?
Keep the fan off and hold a vacuum crevice tool close to where you’re brushing. Working in small sections and wiping the vent face at the end also reduces the dust that re-settles. - Is it safe to spray cleaner into the vent?
Many people do, but it’s often cleaner and lower-risk to spray onto a microfiber instead, then wipe and brush. If you suspect HVAC mold or you’re considering stronger chemicals, it may be smarter to consult a professional. - What size detailing brush is best for tight vent slats?
Small brushes with a tapered head tend to fit between slats without forcing them. Very large, fluffy brushes can be comfortable, but they often struggle to reach corners and can fling dust. - Do vent cleaning gel tools work better than brushes?
They can pick up fine dust on the surface, but they’re not always great for sticky buildup and can leave residue if overworked. A brush plus vacuum is usually more consistent, and you can finish with a microfiber for a cleaner look.
If you’re trying to build a simple interior kit, or you want a more dependable way to choose the best car interior detailing brush for ac vents without buying a random bundle, focus on one vent-safe brush plus one ultra-soft brush for delicate trim, and keep them clean between uses.