
How to replace a car horn is usually a straightforward DIY job when the horn itself failed, but the tricky part is proving it’s the horn and not a fuse, relay, or wiring issue.
If your horn sounds weak, clicks once, works only sometimes, or stays completely silent, you’re not just dealing with an annoyance, you’re losing a safety tool you may need in traffic. The good news is most replacements take under an hour, and you don’t need special diagnostic gear to get it right.

I’m going to walk you through a realistic process: quick checks first (so you don’t buy parts you don’t need), then removal and install, then a short test routine. I’ll also flag the spots where people commonly get stuck, like access behind the bumper and confusing horn connectors.
Confirm it’s the horn (not the fuse, relay, or switch)
Before you order anything, spend a few minutes narrowing the fault. A dead horn can be the horn unit, but often it’s the power path feeding it.
- No sound at all: could be fuse, relay, clock spring, horn switch, wiring, or the horn itself.
- Weak / raspy sound: often a failing horn, corroded ground, or low voltage at the connector.
- Intermittent: loose connector, failing relay, broken wire near the radiator support, or moisture intrusion.
According to NHTSA, the horn is a required safety device on passenger vehicles, so if it’s not working consistently, treating it as “optional” tends to end badly at inspection time or in a close-call moment.
Quick checks that save time
- Check the fuse labeled HORN (or similar) in the fuse box diagram. Replace only with the same amperage.
- Swap the horn relay with an identical relay in the fuse/relay box (often AC clutch or fog lamps) just for a test.
- Listen for a relay click when you press the horn. A click suggests the switch side works, but power to the horn may still be missing.
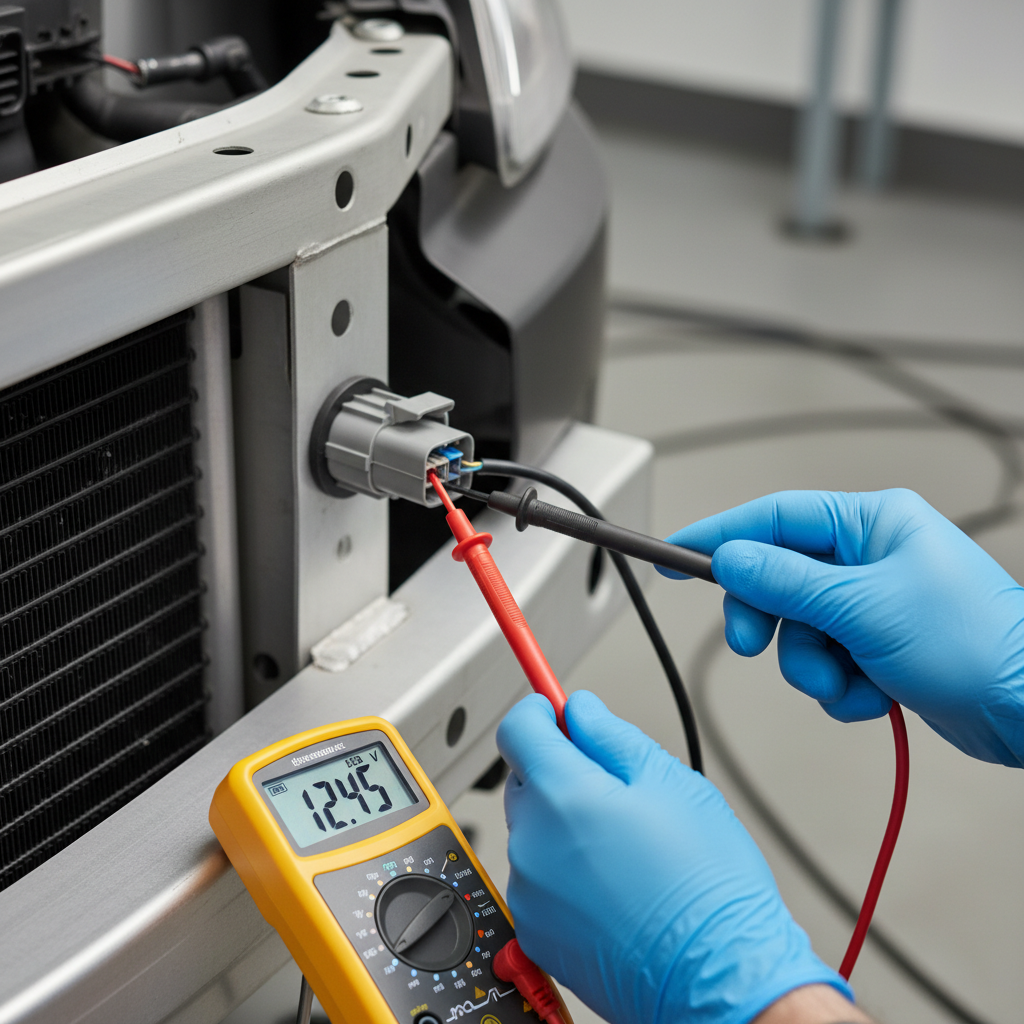
- Test voltage at the horn connector with a multimeter or test light while someone presses the horn.
Self-check checklist: do you really need replacement?
Use this as a quick decision filter. It’s not lab-grade diagnosis, but it matches what usually happens in a driveway or parking lot.
| What you observe | Most likely cause | Best next step |
|---|---|---|
| Fuse blows again immediately | Short to ground or wrong horn wiring | Stop, inspect harness and connector, consider a shop |
| Relay clicks, horn silent, 12V present at connector | Horn unit failed | Replace horn |
| No relay click, other functions on steering wheel act up | Clock spring or switch issue | Diagnose steering wheel circuit, consider professional help |
| Horn works when you tap it or wiggle connector | Corrosion / loose terminal | Clean, tighten, add dielectric grease |
| Horn weak, voltage low at connector | Bad ground or resistance in wiring | Check grounds, inspect wiring, test voltage drop |
Key point: if you have solid power and ground but no sound, learning how to replace a car horn becomes the correct “next move,” not guesswork.
Tools, parts, and what to buy (without overthinking it)
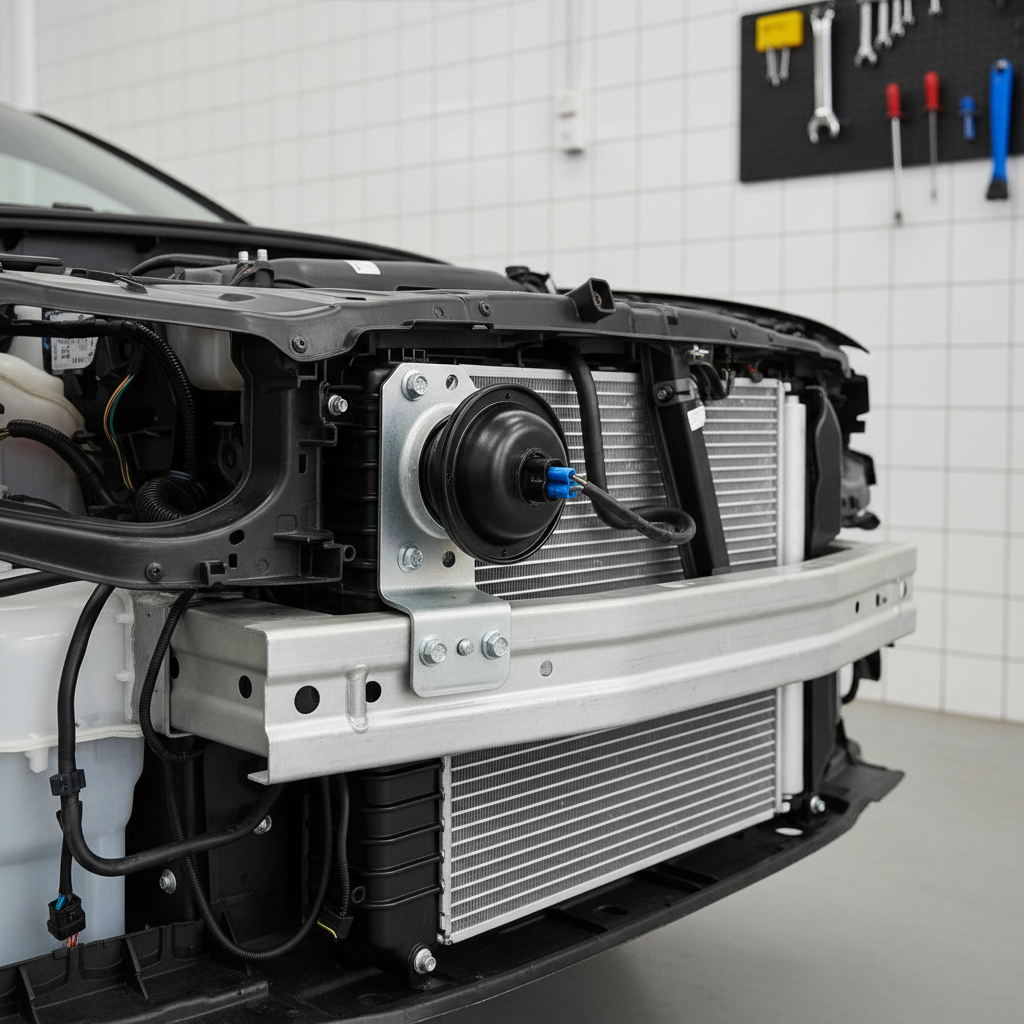
Most cars use one or two horns mounted near the radiator support behind the grille, sometimes behind the bumper cover. Access varies a lot by model.
- Basic tools: ratchet and sockets, trim clip tool or flat screwdriver, gloves, flashlight.
- Helpful tools: multimeter or test light, small wire brush, dielectric grease.
- Replacement horn: OEM-style direct-fit is easiest; universal horns can work but may require wiring changes or brackets.
If your vehicle has dual horns (high and low tone), match what’s already installed or replace both so the sound stays balanced. Also check the connector style before you buy, some use spade terminals, others use sealed plugs.
Step-by-step: how to replace a car horn
This is the typical process on many U.S. vehicles. Your exact fasteners and access points vary, so using your owner’s manual for jack points and a repair manual for panel removal can save frustration.
- 1) Park safely and kill power. Flat surface, parking brake on, key off. If you’ll be near the radiator fan area, let the engine cool.
- 2) Disconnect the negative battery terminal. This reduces the chance of accidental shorts and surprise honks.
- 3) Locate the horn(s). Look behind the grille, near the radiator support, or behind the front bumper cover. Some cars allow access from above, others from below after removing a splash shield.
- 4) Unplug the connector. Press the tab, pull straight off. If it’s stuck, don’t yank the wires, work the connector body.
- 5) Remove the mounting bolt. Usually a single bolt holding a bracket. Keep the hardware if the new horn doesn’t include it.
- 6) Match orientation. Many horns have a drain opening; mounting them the same direction helps prevent water sitting inside.
- 7) Install the new horn. Bolt it down snug. A loose bracket can make the horn sound weak or “buzzy.”
- 8) Reconnect wiring. Ensure the connector fully seats and locks.
- 9) Reconnect the battery and test. One or two quick presses, then shut off and re-check mounting and connector fit.
If you had to remove trim clips or a splash shield, reinstall them carefully. Missing fasteners can cause rattles that you’ll hear every day.
Universal horn note (only if you must)
Universal horns can be fine, but they sometimes draw more current or use different terminals. If wiring doesn’t match, don’t twist wires together and hope for the best. Use proper crimp connectors, heat shrink, and route wires away from sharp edges and hot components.
Troubleshooting after install: when it still won’t honk
It’s annoying, but not rare, to install a horn and get silence because the real issue was upstream. These checks usually pinpoint what you missed.
- No sound and no relay click: likely horn switch circuit, relay control, clock spring, or related steering wheel wiring.
- Relay clicks but no horn: check power at horn connector under load, inspect ground, verify connector seating.
- Horn works but sounds weak: check bracket tightness, corrosion at ground point, and voltage drop in the supply wire.
- Horn works only with engine running: suggests low voltage condition or resistance in wiring.
According to SAE International, electrical connections in harsh environments often fail due to vibration and corrosion, so a “good looking” connector can still cause voltage loss. If you suspect that, cleaning terminals and improving the ground path often makes an immediate difference.
Common mistakes and safety notes (worth reading)
This job is simple, but the same few mistakes waste the most time, or create new problems.
- Skipping the fuse/relay check: you can replace a perfectly good horn and still have no sound.
- Not disconnecting the battery: accidental shorts happen fast near the radiator support, and some cars pack a lot of wiring up front.
- Mounting the horn facing up: water can collect, shortening horn life in many climates.
- Over-tightening plastic trim clips: they crack easily, then panels sag or rattle.
- Using an incorrect fuse rating: upsizing a fuse can hide the symptom while risking wire damage.
If you’re working near airbags or steering wheel components during diagnosis, caution matters. Some issues that mimic a horn failure can involve the clock spring or steering wheel wiring, and in those situations it may be smarter to consult a qualified technician.
When to get professional help
Replacing the horn itself is one thing, chasing an intermittent electrical fault is another. Consider a shop or mobile mechanic if any of these are true:
- The horn fuse keeps blowing, especially immediately after replacement.
- You suspect steering wheel switch, clock spring, or airbag-area wiring.
- Access requires bumper removal and you’re not comfortable aligning panels and clips.
- You measure inconsistent voltage and can’t locate the resistance point.
It’s not about ability, it’s about time and risk. Electrical diagnosis can turn into a half-day project quickly.
Conclusion: the simplest path to a reliable horn
If your checks show power and ground reaching the connector, how to replace a car horn becomes a clean, low-drama fix: disconnect the battery, unbolt the old unit, plug in the new one, then test and secure everything. If power never shows up, the smarter move is stepping back and diagnosing the fuse, relay, ground, or steering wheel circuit before buying more parts.
Action steps: do a 5-minute fuse/relay test today, then decide whether you’re doing a direct-fit replacement or booking help for deeper electrical troubleshooting.
If you need a more hands-off approach, or your horn issue looks like wiring rather than the horn itself, a local mechanic or reputable mobile technician can usually confirm the fault quickly and help you avoid swapping parts blindly.