
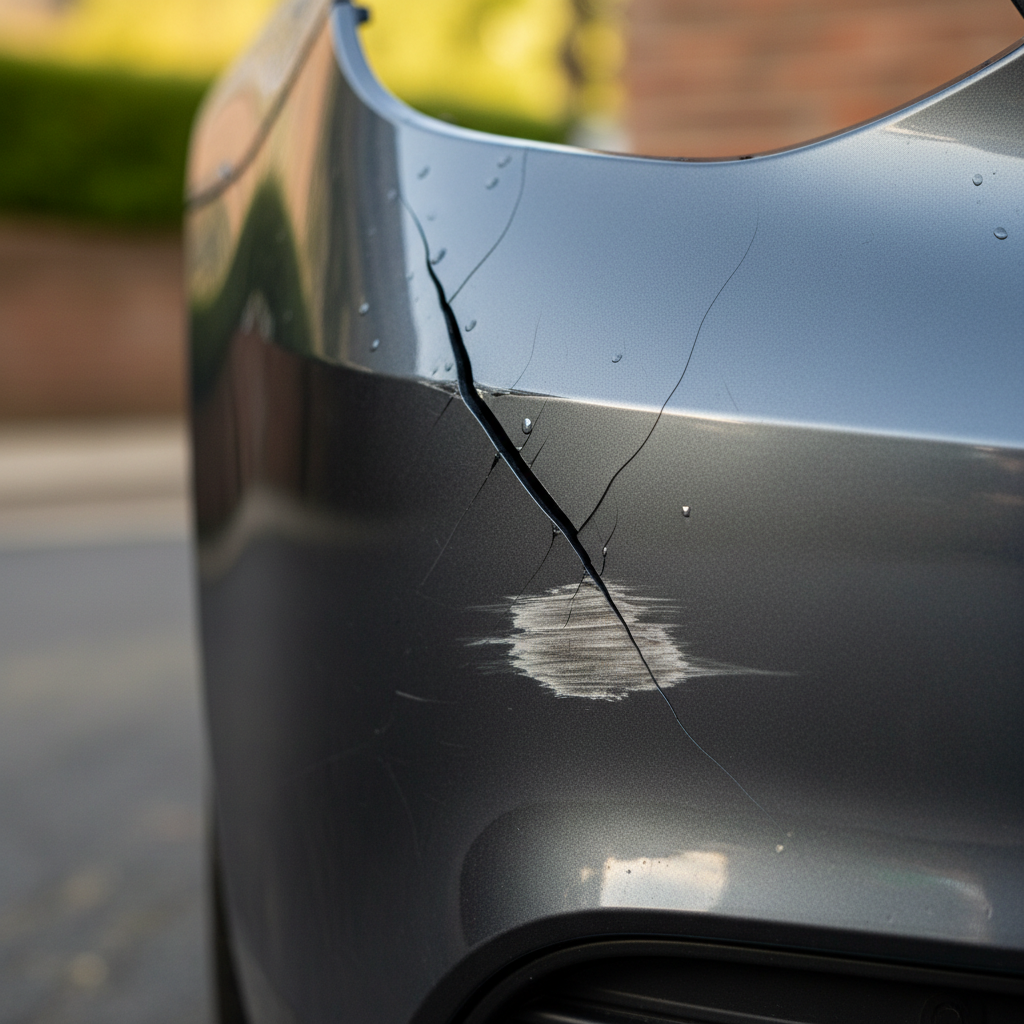
How to fix a cracked car bumper usually comes down to one question: is the plastic still structurally sound, or is it torn, missing chunks, or pulling away from mounts.
If you catch a crack early, a DIY repair can hold up well and look surprisingly decent, especially on everyday drivers where you care more about stopping the spread than chasing a showroom finish.
This guide breaks down what causes bumper cracks, how to judge whether you should repair or replace, and a step-by-step workflow that matches what many body shops do, just scaled for a garage setup.
Why car bumpers crack (and why cracks keep growing)
Most modern bumpers are plastic covers over reinforcement parts, and that cover flexes constantly. Cracks usually start with a hit, but they keep spreading due to stress and vibration.
- Low-speed impacts from parking bumps can start a hairline split that slowly opens up.
- Cold weather tends to make plastics more brittle, so a minor tap can turn into a sharp crack.
- Poor prior repairs like filler over unreinforced plastic often re-crack along the same line.
- Loose mounts or clips let the bumper cover flap, which works the crack wider.
- Bottoming out on curbs or steep driveways can crack the lower lip where it flexes most.
One practical takeaway: if you only “cosmetically” hide the crack without reinforcing it, the crack often returns when the bumper flexes again.
Repair vs replace: a quick decision table
Before you buy supplies, get clear on whether fixing makes sense. Some bumper damage is technically repairable but not worth your time if mounting points are torn or pieces are missing.
| What you see | Typical DIY outcome | What usually works better |
|---|---|---|
| Hairline crack, no missing plastic | Good if reinforced from behind | Plastic weld or epoxy + mesh |
| Crack that goes through, edges still align | Good to fair, needs clamping and backing | Plastic weld is often strongest |
| Crack at a mounting tab or bolt hole | Fair, may fail if stress stays high | Replace tab/retainer, reinforce heavily |
| Chunk missing, torn plastic, distorted shape | Usually poor without advanced work | Replacement cover or pro repair |
| Paint damage only (no crack) | Good cosmetic improvement | Sand, prime, paint as needed |
According to NHTSA (National Highway Traffic Safety Administration), even minor crashes can damage vehicle components in ways that are not always obvious, so if you suspect deeper impact damage behind the bumper cover, a professional inspection may be a safer call.
Self-check checklist before you start
Use this quick list to classify your situation. It saves you from buying the wrong “miracle kit” and getting a repair that pops the first time you hit a pothole.
- Is the crack moving? Press near the crack; if it opens/ closes easily, you need reinforcement from the back side.
- Are the edges aligned? If they don’t meet cleanly, heat warping or missing material may be involved.
- Any broken clips or mounts? A solid crack repair won’t hold if the bumper hangs loose.
- What plastic is it? Many covers are PP/TPO; some adhesives won’t bond well without the right prep and promoter.
- How visible is the area? Lower corners can tolerate “good enough,” but eye-level fascia cracks usually need paint blending.
Key point: if you can access the back side of the crack, your odds of a durable fix jump a lot.
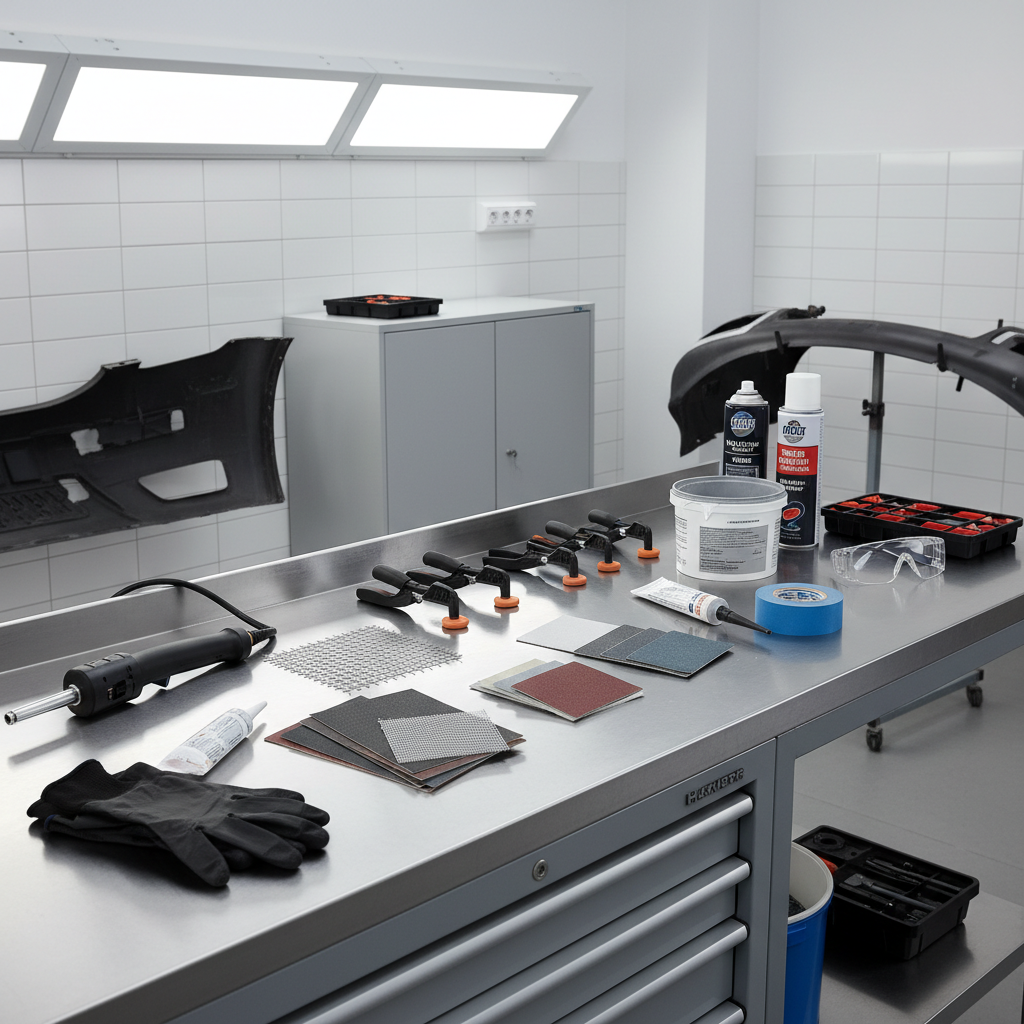
Tools and materials: what you actually need (and what you can skip)
For most DIY jobs, you’re choosing between two reinforcement methods: plastic welding or a 2-part repair epoxy with mesh. Either can work, but plastic welding tends to handle flex better when done right.
Common tool list
- Car wash soap, wax/grease remover or isopropyl alcohol
- Sandpaper: 80, 180, 320, 600 grit (you may not need every step)
- Drill with small bit (to stop-drill crack ends)
- Clamps or painter’s tape to hold alignment
- Option A: plastic welder or temperature-controlled soldering iron, plus plastic welding rods (matching plastic type if possible)
- Option B: 2-part bumper repair adhesive (plastic epoxy/urethane) + fiberglass or stainless mesh
- Flexible bumper filler (not standard rigid body filler, if you plan to smooth the front)
- Adhesion promoter, primer, color-matched paint, and clear coat (for cosmetic finish)
- Safety gear: gloves, eye protection, respirator for sanding/painting
Stuff people overbuy: huge “paint kits” before confirming the crack is stable. Get the structure right first, cosmetics second.
Step-by-step: how to fix a cracked car bumper (DIY workflow)
How to fix a cracked car bumper in a way that lasts usually follows this order: stop the crack, align it, reinforce the back, then make the front look presentable.
1) Remove or loosen the bumper cover if access is tight
You can sometimes repair on-car, but it’s harder to reinforce properly. If you can remove the cover, you’ll get better alignment and a cleaner backside bond.
- Take photos of fastener locations as you go.
- Check for broken clips, retainers, or torn mounting holes and plan to address them.
2) Clean like you mean it
Road film, silicone dressings, and wax are common reasons repairs fail. Wash, dry, then wipe with wax/grease remover.
3) Stop-drill the crack ends
Drill a small hole at each end of the crack, right where it stops. This reduces stress concentration and can keep the split from creeping farther.
4) V-groove the crack (front side) and rough up the back side
On the front, a shallow V-groove gives filler or weld material a place to sit. On the back, rough sanding creates “tooth” for welds or adhesives.
- Front: light V-groove, avoid removing too much plastic.
- Back: sand a wider area than you think, at least 1–2 inches around the crack.
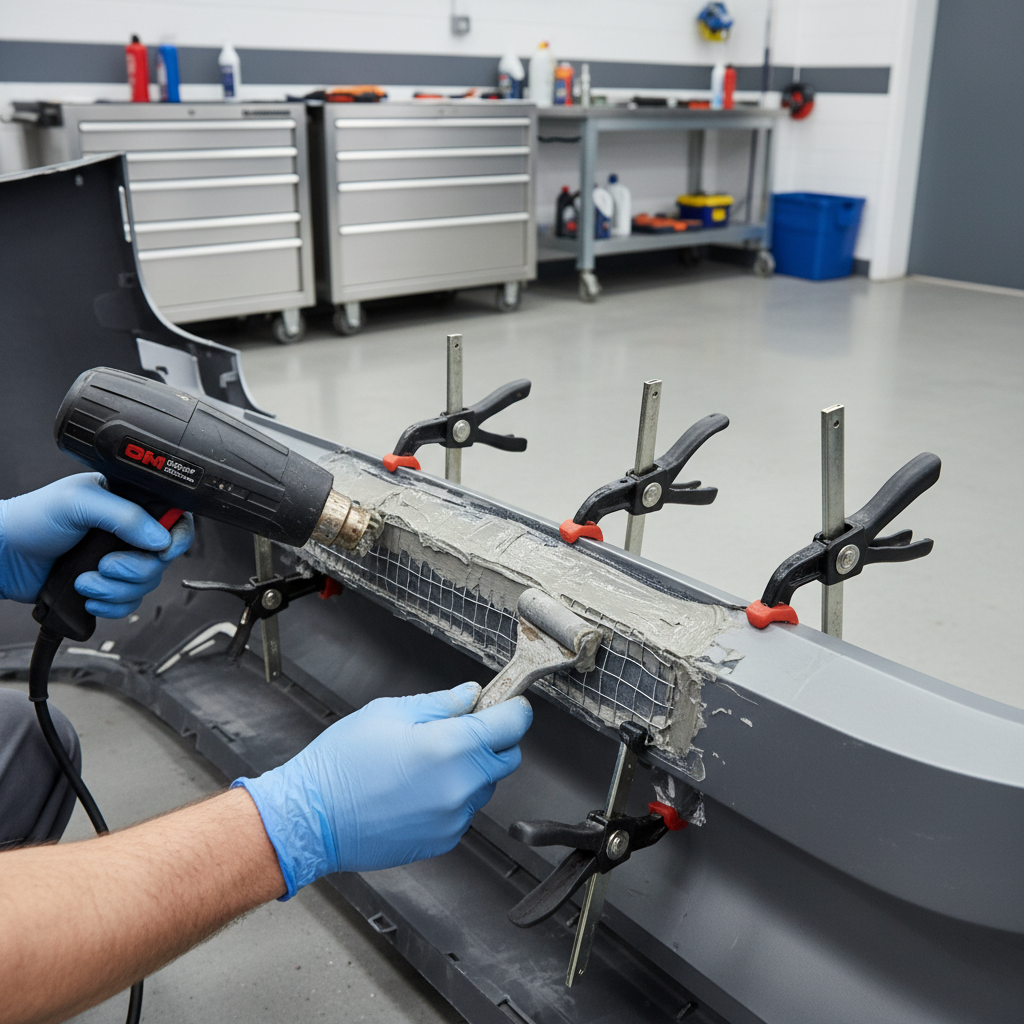
5) Reinforce from behind: pick one method
Plastic welding method (often stronger on flexible covers):
- Clamp or tape the crack aligned from the front.
- Tack-weld across the crack on the back side to lock alignment.
- Embed mesh or “staples” if your kit supports it, then weld over it to spread load.
- Add welding rod material to build a smooth, continuous bridge.
Epoxy + mesh method (more accessible, still decent when prepped well):
- Mix the 2-part adhesive exactly per instructions, don’t eyeball ratios.
- Press mesh into the adhesive on the back side, extending past the crack.
- Add another layer over the mesh, feathering edges to reduce a hard ridge.
- Let it cure fully; rushing cure time is where a lot of “it cracked again” stories come from.
Reality check: if the crack sits at a high-stress mounting point, double up reinforcement and fix the mount so it stops pulling on the cover.
6) Smooth the front and prep for paint (if appearance matters)
Once the back side is solid, move to the front. Sand the V-groove area, apply flexible bumper filler in thin layers, then sand to shape.
- Shape sanding: 180 to 320 grit.
- Finish sanding before primer: often 400 to 600 grit, depending on product directions.
- Use adhesion promoter on plastic where required; many bumper paints assume it.
7) Prime, paint, and clear (or stop earlier)
Not every repair needs a full respray. If the crack sits low and you don’t care much about looks, you might stop after reinforcement and basic smoothing.
If you do paint, follow the can tech sheet for flash times and temperature range, and expect that perfect color match can be tricky on older paint due to sun fade.
Common mistakes that make bumper repairs fail
- No backside reinforcement: filler alone is cosmetic, and bumper covers flex.
- Skipping proper cleaning: adhesives and paint hate wax and silicone.
- Not addressing broken mounts: the cover keeps pulling, the crack returns.
- Too much heat while welding: overheating can thin or warp plastic, making alignment worse.
- Using the wrong filler: standard body filler can be too rigid for flexible covers.
Also, if you’re learning how to fix a cracked car bumper from short videos, watch for what they don’t show: cure time, backside prep, and how they keep the crack aligned while setting.
When it makes sense to get a body shop involved
DIY is great for many cracks, but some cases are where a shop saves money long-term, because you avoid repeat failures and repainting.
- The crack runs through a sensor area (parking sensors, radar behind bumper on some cars), where fit and surface shape matter.
- There’s damage behind the cover such as energy absorber issues, bent brackets, or misalignment after an impact.
- The bumper has multiple cracks or torn mounting points and won’t sit flush.
- You need a near-invisible paint match on a newer vehicle or a lease return.
According to I-CAR (Inter-Industry Conference on Auto Collision Repair), modern vehicle construction and advanced driver assistance components can affect repair procedures, so if you’re unsure about what sits behind your bumper cover, asking a qualified collision shop for guidance can be the safer move.
Practical tips for a cleaner finish (without obsessing)
You can get a noticeably better result with a few small habits, not necessarily more products.
- Test-fit often before paint, especially around wheel arch gaps and headlight edges.
- Feather your sanding wider than the repair, so the transition disappears.
- Use light coats of primer and paint to reduce runs and texture.
- Blend expectations: rattle-can paint can look good from 5 feet, but a perfect match may require professional mixing and spray equipment.
Key takeaways
- Durability comes from reinforcement, ideally from the back side of the bumper cover.
- Stop-drilling crack ends and fixing loose mounts can keep the split from returning.
- Plastic welding often handles flex better, while epoxy + mesh is a solid alternative if prepped correctly.
- Cosmetic steps matter, but only after the crack is stable.
Conclusion: a solid crack repair is more process than product
If you’re deciding how to fix a cracked car bumper, focus on alignment, backside support, and realistic expectations for paint match, that combination usually beats any single “all-in-one” kit. Pick one reinforcement method, take cleaning and cure time seriously, then decide how far you want to go on appearance.
If you want a simple next step, inspect mounts and access to the backside first, then buy materials that fit that reality rather than forcing a method that doesn’t fit your bumper layout.