
How to fix a leaking car tire usually comes down to two things: finding where the air escapes, then choosing the right repair that matches the leak type. Some leaks are a quick driveway fix, others should not be repaired at all.
A slow leak is more than an annoyance, it can quietly drop pressure between drives, increase heat in the tire, and make handling feel “off” when you least expect it. If you catch it early, you often save the tire and avoid uneven wear.
This guide walks you through practical ways to locate the leak, a simple decision process for plug vs patch, and safe next steps if the tire is damaged in a way that a DIY repair should not touch.

Safety first: what to do before you inspect
Before you start hunting for the leak, keep the situation controlled. A tire that looks “kind of low” can still be dangerously underinflated.
- Don’t drive far on a low tire. If the sidewall looks squished, stop and add air or install the spare.
- Park on level ground, set the parking brake, and turn on hazard lights if you’re roadside.
- Use wheel chocks if you’ll jack the car up. Even a small roll matters.
- Check the recommended PSI on the driver door jamb label, not the tire sidewall.
According to NHTSA, tires are a key safety component and should be inspected regularly for proper inflation and damage, especially before long trips.
Common causes of a leaking tire (and what they look like)
Most slow leaks come from a few repeat offenders. If you know the likely causes, your inspection gets faster.
- Nail or screw in the tread: often a slow hiss, sometimes you’ll see a shiny head in a groove.
- Leaking valve stem: pressure drops, and you may see cracking rubber or hear air near the valve.
- Loose or damaged valve core: the tiny inner valve can seep, especially after rough fills.
- Bead leak at the rim: air escapes where tire meets wheel, common with corrosion or bent wheels.
- Cracks, bubbles, sidewall damage: may leak or fail suddenly, usually not repairable.
- Rim damage: pothole impacts can bend the wheel, causing persistent leaks even after reinflation.
One quick reality check: if the tire loses most of its air overnight, it’s often more than a “tiny puncture,” or the puncture is in a spot that won’t hold a simple fix.
Fast self-check: find the leak in 10–20 minutes
When people search how to fix a leaking car tire, the step they skip is confirming the leak location. Don’t guess. Find it.
What you’ll need
- Air source (portable inflator, compressor, or gas station air)
- Spray bottle with soapy water (dish soap + water)
- Tire pressure gauge
- Good light, gloves
Where to check (in order)
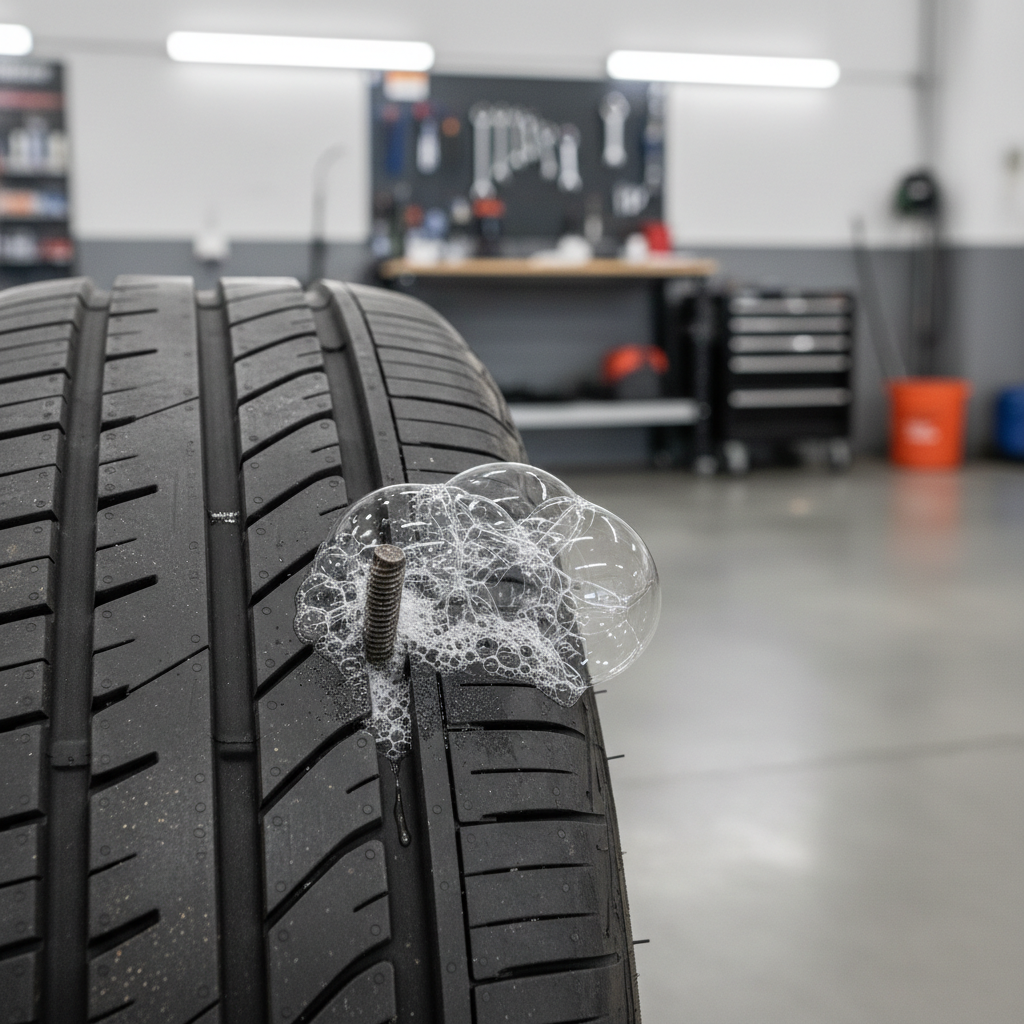
- Tread area: spray soapy water across the grooves, watch for growing bubbles.
- Valve stem + valve core: spray around the stem base and on the valve tip.
- Bead area: spray around where the tire meets the rim on both sides.
- Wheel itself: look for cracks (rare), bends, or heavy corrosion near the bead seat.
If you can’t find bubbles but pressure still drops, measure PSI at the same time each day for 2–3 days. Temperature swings can mimic a leak, and the pattern helps you separate normal variation from a real problem.
Plug vs patch vs replace: a simple decision table
A lot of tire frustration comes from choosing the wrong repair for the damage. This quick table helps you decide what’s realistic.
| Leak type | Typical symptom | What usually works | DIY-friendly? |
|---|---|---|---|
| Small puncture in tread (straight) | Slow leak, object in tread | Internal patch or patch-plug combo | Best done at a shop |
| Temporary tread puncture fix | Need to get home safely | External plug (temporary in many cases) | Yes, with a kit |
| Leak at valve core | Bubbles at valve tip | Tighten/replace valve core | Yes |
| Cracked valve stem | Bubbles at stem base | Replace valve stem (tire off rim) | Usually shop |
| Bead leak / rim corrosion | Bubbles at rim edge | Clean/seal bead, address rim damage | Often shop |
| Sidewall puncture/cut/bulge | Visible damage on side | Replace tire | No |
According to USTMA (U.S. Tire Manufacturers Association), punctures in the tread area may be repairable when they meet certain criteria, while sidewall damage is generally not considered repairable.
DIY fixes you can do at home (step-by-step)
There are a couple repairs that are genuinely reasonable in a driveway. They’re not magic, but they solve many slow leaks without drama.
Fix 1: Tighten or replace a leaking valve core
If bubbles appear at the valve tip, the valve core may be loose or worn.
- Remove the valve cap.
- Use a valve core tool to snug the core gently, do not over-tighten.
- If it still bubbles, replace the core with a new one (cheap and common).
- Reinflate to the door-jamb PSI and recheck with soapy water.
Key point: a valve cap is not just “a dust cover,” it helps protect the valve from grit that can cause slow leaks.
Fix 2: Use a plug kit for a small tread puncture (temporary by nature)
If you find a nail/screw in the tread and you need a short-term fix, a plug kit can help you get to a tire shop. Many drivers use plugs longer, but it’s smart to treat it as a bridge, not a forever solution.
- Mark the puncture spot, then remove the object with pliers.
- Ream the hole using the tool from the kit (this step feels wrong, but it prepares the channel).
- Thread the plug strip into the insertion tool, apply rubber cement if your kit includes it.
- Insert the plug until a small portion remains outside, then pull the tool out sharply.
- Trim excess plug material, reinflate, and check for bubbles.
If the hole is large, ragged, or at the shoulder area near the sidewall, stop and plan for a professional evaluation instead of forcing a plug.

When a shop repair is the smarter move
If you want the repair that most tire pros prefer for a tread puncture, it’s typically an internal patch or a patch-plug combination applied from inside the tire. That requires removing the tire from the wheel and inspecting the inside for hidden damage.
- You can’t confirm internal damage from the outside. Driving on low pressure can scuff the inner liner.
- Bead leaks often return if corrosion or wheel shape issues aren’t corrected.
- TPMS sensors sit at the valve stem area on many vehicles, and careless work can break them.
If you’re comparing costs, don’t just compare “plug price” vs “patch price.” Compare the chance you’ll be back in two weeks topping up air again.
Common mistakes that make leaks worse
Some “fixes” feel productive but create new problems, especially at highway speeds.
- Using slime/sealant as a first choice: it can help in emergencies, but it may complicate later repairs and can interfere with TPMS readings in some cases.
- Ignoring a slow leak: repeated underinflation often leads to shoulder wear and heat damage.
- Trying to repair sidewall damage: plugs and patches are not meant for the sidewall, replacement is usually the safe call.
- Overinflating “to stop the leak”: higher pressure doesn’t fix the hole, it can increase stress.
According to AAA, keeping tires properly inflated supports safer handling and helps reduce the chance of tire-related breakdowns.
Practical “what should I do next?” checklist
If you want a quick plan without overthinking it, use this:
- Pressure drops fast or tire looks deformed: put on the spare or tow, then have the tire inspected.
- Leak at valve tip: replace the valve core, then recheck.
- Small tread puncture: plug it only if you must, then schedule a shop repair soon.
- Bubbles at bead or rim edge: expect a wheel/tire shop visit, ask them to check rim corrosion or bends.
- Sidewall cut, bulge, cords showing: replace the tire and inspect the wheel alignment if wear looks uneven.
Conclusion: fix the leak, then protect the tire
How to fix a leaking car tire is really a two-part job: confirm the leak source, then match the repair to the damage. Valve core leaks are the easiest win, tread punctures often need a proper internal repair, and sidewall issues tend to mean replacement.
If you take one action today, make it this: inflate to the correct PSI, do the soapy-water test, and decide plug vs shop based on where the bubbles show up. That one small check prevents a lot of repeat headaches later.