
How to check car coolant level and quality is a quick habit that can save you from overheating, heater problems, and a repair bill that arrives at the worst time. The good news is you can get a reliable read in a few minutes with basic tools, as long as you do it safely.
A lot of drivers only think about coolant after the temperature gauge spikes or steam shows up, but coolant issues often give quieter hints first, like weak cabin heat, a sweet smell, or needing to top off more than once. Checking both level and quality matters, because “full” coolant that’s contaminated or wrong-mix can still cause corrosion and poor heat transfer.
This guide stays practical: what to look at, what “bad coolant” really looks like, how to top off correctly, and when it’s smarter to stop and get a shop involved. If you’re not sure what coolant type your car uses, that’s normal, we’ll cover how to confirm it without guessing.
What coolant does, and why level vs. quality are different checks
Coolant, also called antifreeze, moves heat away from the engine, helps prevent freezing in winter, and includes corrosion inhibitors that protect metal parts inside the cooling system. When coolant degrades, you can still have “enough fluid,” yet lose protection.
Level check answers: Do I have enough coolant in the system to circulate and control temperature?
Quality check answers: Is the coolant still chemically healthy, the right mixture, and free of contamination that could damage the radiator, water pump, or heater core?
According to the National Highway Traffic Safety Administration (NHTSA), you should not remove a radiator cap when the engine is hot because hot coolant can spray out under pressure and cause burns. That warning alone is why most DIY checks should happen at the reservoir when the engine is cold.
Tools and prep: what you actually need before you open the hood
You can do a basic inspection with almost nothing, but a couple of small items make it cleaner and more accurate.
- Safety: nitrile gloves, a shop towel, and eye protection if you’re working close to caps or hoses.
- Light: phone flashlight or a small LED light for reading reservoir marks.
- For quality/mix: a coolant tester (hydrometer/float style) or refractometer, plus a clean cup if needed.
- Correct fluid: the exact coolant spec your owner’s manual calls for, and distilled water if you’re mixing concentrate.
Park on a level surface, let the engine cool fully, and set the parking brake. If you drove recently, waiting 30–60 minutes is common, but time varies by vehicle and weather, so err on the cautious side.
How to check coolant level (cold engine) in 3 minutes
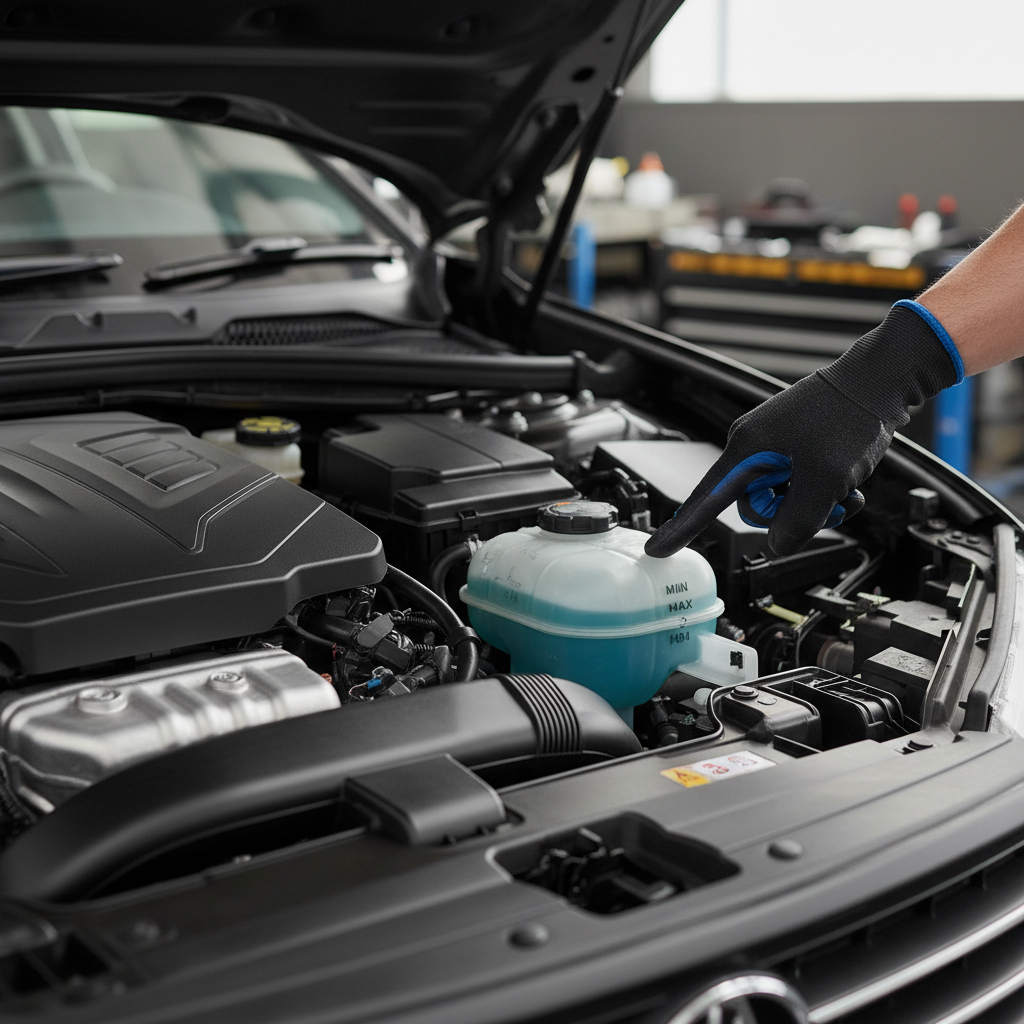
Most modern cars have a translucent overflow/expansion tank with “MIN” and “MAX” lines. That’s the safest place to start.
Step-by-step: reservoir check
- Find the reservoir: look for a plastic tank with a cap labeled “coolant” or a temperature warning icon.
- Read the marks: compare the fluid line to MIN/MAX (or “LOW/FULL”).
- Check when cold: many tanks have “COLD” marks; if yours does, use those for the most honest reading.
- Look around it: wetness, crusty residue, or staining can hint at a slow leak.
If the reservoir is empty but you don’t see obvious leaks, don’t assume it’s “just low.” A cooling system can lose coolant internally, and continuing to drive may risk overheating. In that case, topping off can be a short-term move, but diagnosis matters.
Radiator cap check: only if you know what you’re doing
Some vehicles still use a radiator cap as the primary fill point. If you’re considering opening it, don’t do it hot, and don’t force it. If you’re unsure, stick with the reservoir check and ask a mechanic to verify the radiator level during service.
How to check coolant quality: color, clarity, smell, and feel
Quality checks are partly visual, partly “does it behave like coolant should,” and sometimes test-strip or tool-based. You’re looking for signs the inhibitors are spent, the fluid is contaminated, or the wrong coolant got mixed in.
Quick visual and smell checks
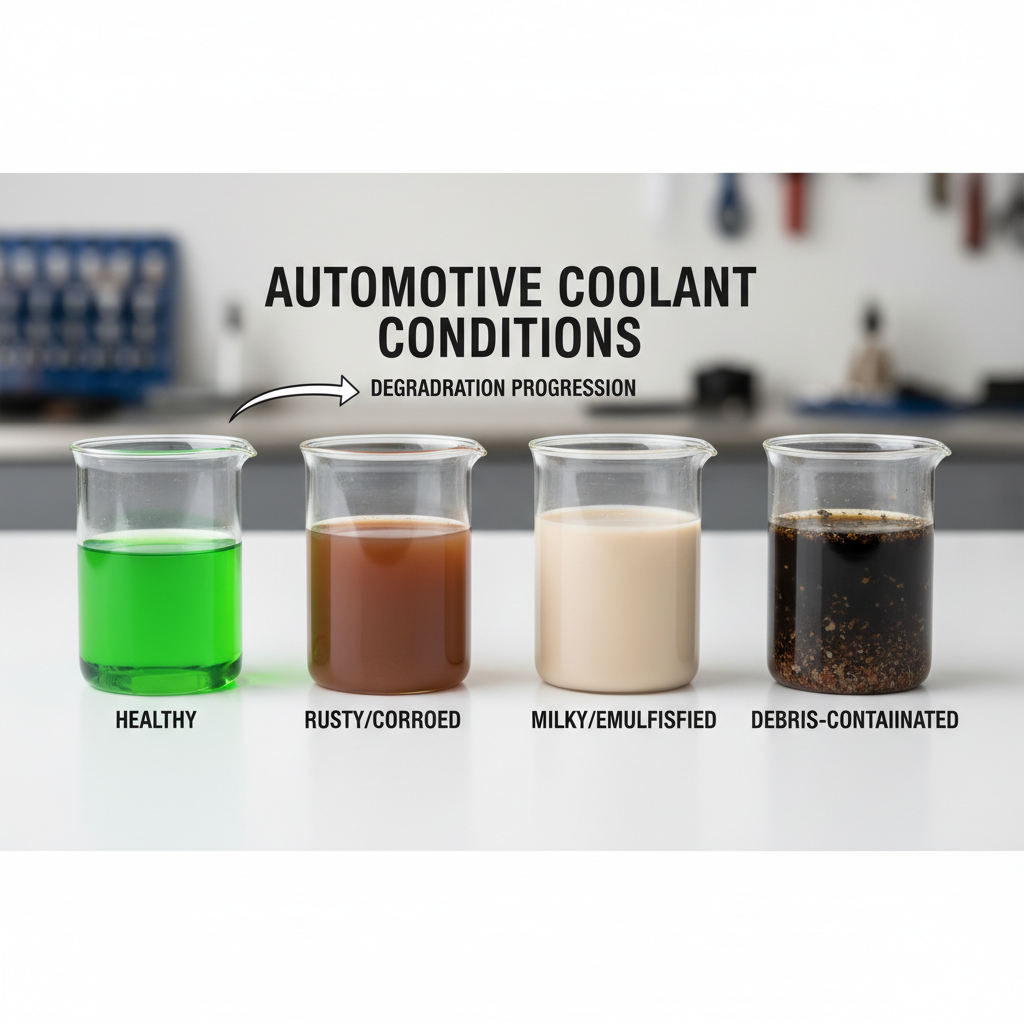
- Color: coolant comes in several colors (green, orange, pink, blue, yellow) depending on chemistry, so color alone doesn’t prove it’s right. What matters is whether it looks uniform and not rusty or muddy.
- Clarity: healthy coolant usually looks clear/translucent. Cloudiness can suggest mixing incompatible types or contamination.
- Particles/sludge: floating debris or gel-like sludge is a red flag for corrosion, mixing issues, or neglected service intervals.
- Smell: a sweet smell near the engine bay or inside the cabin can point to a leak; it’s not a perfect test, but it’s a useful clue.
If coolant looks milky or “foamy,” that can indicate oil contamination, which may be a more serious issue. It doesn’t automatically confirm a head gasket problem, but it’s not something to ignore.
Use a tester to check freeze/boil protection (the part visuals can’t confirm)
Even coolant that looks fine might be too diluted. That reduces freeze protection and raises boil risk, especially in summer traffic or when towing. Testing is the only way to be confident about mixture.
Two common DIY options
- Hydrometer (float tester): inexpensive and easy, draws coolant and reads a scale. Accuracy depends on tool quality and correct coolant type.
- Refractometer: more precise, uses a drop of coolant and a light scale. Costs more but tends to be more reliable across conditions.
Follow the tester instructions carefully and sample from a clean point. If you’re pulling from the reservoir, avoid scooping debris from the bottom. If results look borderline and you’re not sure, many shops can confirm with professional equipment during a coolant service.
Fast self-check: what your results usually mean
Here’s a practical interpretation guide. It won’t cover every edge case, but it helps you decide whether to top off, monitor, or stop driving.
| What you see | What it may indicate | What to do next |
|---|---|---|
| Level slightly below MIN, coolant looks clean | Normal evaporation or small loss over time | Top off with correct coolant mix, then recheck in a week |
| Level drops repeatedly | External leak, weak cap, hose seep, radiator issue | Inspect for residue/wet spots, schedule a pressure test |
| Rusty brown color or heavy sediment | Corrosion, depleted inhibitors, neglected service | Plan a coolant flush/refill, inspect radiator and hoses |
| Cloudy or gel-like coolant | Mixed incompatible coolant types or contamination | Avoid mixing more, ask a shop about full drain and refill |
| Milky coolant or oily film | Possible oil contamination | Minimize driving, get professional diagnosis soon |
How to top off coolant safely (and not create a new problem)
Topping off is simple, but this is where people accidentally mix the wrong chemistry or dilute too far. If your goal is to learn how to check car coolant level and quality, topping off is the “action step” that should follow only when you’re confident about the coolant type.
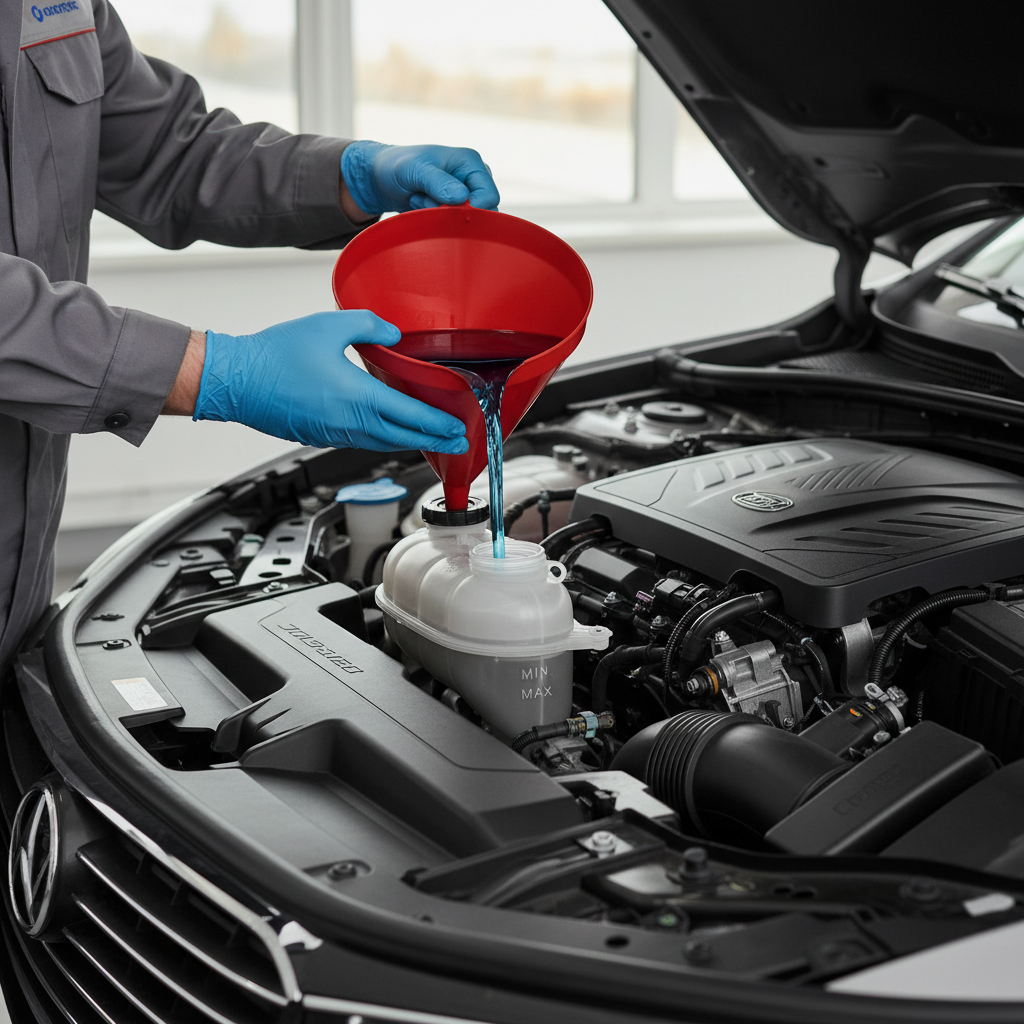
Practical top-off steps
- Confirm the correct spec: check the owner’s manual or the label under the hood. Don’t rely on color alone.
- Use the right mix: many products are pre-mixed 50/50. If you buy concentrate, mix with distilled water unless your manual says otherwise.
- Add small amounts: pour to just under the MAX line (cold mark if available).
- Cap it and monitor: drive normally, then recheck after a couple of heat cycles and again in a few days.
If you’re stranded and can’t get coolant, adding a small amount of water may be a temporary move in some situations, but it changes protection and isn’t ideal long-term. If you do it, treat it as “get home / get to a shop,” then correct the mixture soon.
Mistakes that make coolant problems worse (even when intentions are good)
- Opening caps on a hot engine: burn risk is real, and you can also introduce air or lose coolant violently.
- Mixing “universal” coolant blindly: some universal products work in many cases, but compatibility still depends on your vehicle and what’s already inside.
- Overfilling: expansion tanks need space; overfilling can push coolant out and look like a leak.
- Ignoring repeat top-offs: if you keep adding coolant, you’re treating a symptom, not the cause.
- Using tap water for mixing: minerals can contribute to scaling; distilled water is usually the safer default.
Key takeaways:
- Check level only when cold, and use the reservoir marks as your baseline.
- Quality is more than color; look for clarity, sludge, rust, and test the mixture if you can.
- Don’t guess coolant type; confirm the spec before you add anything.
When to stop DIY and get professional help
DIY checks are great for routine monitoring, but some patterns deserve a shop visit sooner rather than later.
- Overheating, temperature warning light, or steam: stop driving when safe, let the engine cool, and consider towing.
- Coolant keeps disappearing with no visible leak: a pressure test and system inspection can pinpoint the source.
- Milky coolant, oily residue, or repeated bubbling: could be contamination or combustion gases in the system, diagnosis matters.
- Heater blows cold at idle even with normal level: may involve air pockets, thermostat issues, or flow restrictions.
According to the American Automobile Association (AAA), overheating is a common cause of roadside breakdowns, and continuing to drive an overheated vehicle can lead to significant engine damage. If the gauge climbs into the red, it’s usually cheaper to pause and get help than to push your luck.
Conclusion: a simple routine that protects your engine
Once you know how to check car coolant level and quality, you stop relying on warning lights to tell you something’s wrong, you catch small leaks earlier, and you make topping off a controlled decision instead of a guess. Set a reminder to check the reservoir monthly and before long trips, and keep the correct coolant in your garage so you’re not buying whatever is closest at the gas station.
If you want one action today, do this: check the level cold, take a quick photo of the reservoir and coolant appearance, then compare again in a week. That simple baseline tells you a lot.
FAQ
- How often should I check my coolant level?
For many daily drivers, once a month and before road trips is a reasonable rhythm. If your vehicle is older or you’ve topped off recently, checking weekly for a short period can help confirm whether the level is stable. - Can I check coolant level when the engine is warm?
You can sometimes read the reservoir level, but readings may be misleading because coolant expands when hot. For safety and accuracy, a cold-engine check is the better standard. - What color should coolant be?
It depends on the coolant chemistry your vehicle specifies, so there isn’t one “correct” color across all cars. More important is that the coolant looks uniform, not rusty, not cloudy, and not sludgy. - Is it okay to mix different coolant types if they look the same color?
Usually not a safe assumption. Different formulas can share similar colors, and incompatibility can create deposits or gel. If you don’t know what’s in the system, consider a full drain and refill after confirming the spec. - Why does my coolant level drop but I don’t see a leak?
Some leaks only show under pressure or evaporate on hot components, and in other cases coolant may be lost internally. A cooling system pressure test is often the quickest way to get clarity. - How do I know if my coolant needs a flush?
If you see rust, sediment, cloudiness, or your test shows weak freeze/boil protection, a flush or drain-and-refill is worth discussing. Also follow your manufacturer’s service interval, since inhibitors wear out even if the car “seems fine.” - Can low coolant cause my heater to blow cold air?
Yes, in many cases. Low coolant or air pockets can reduce flow through the heater core, which often shows up as weak heat at idle.
If you’re trying to keep maintenance simple, a small coolant tester and the correct pre-mixed fluid for your car can make routine checks faster and less stressful, especially before a long drive or a hot-weather commute.