
how to replace car brake shoes rear is very doable at home if you stay organized, keep everything clean, and respect how much stored energy lives in the springs.
Rear drum brakes still show up on plenty of U.S. cars, especially on older sedans, small cars, and some trucks, and the job tends to intimidate people because it looks like a metal spiderweb the moment the drum comes off.
This guide walks through a practical step-by-step flow, plus quick checks to confirm you actually need shoes, and small details that often cause squeaks, pulling, or a soft pedal after the install.
One reality check: brake work is safety work, if anything feels off, or you see heavy corrosion, leaking fluid, or damaged hardware, it’s usually smarter to pause and ask a qualified mechanic for help.
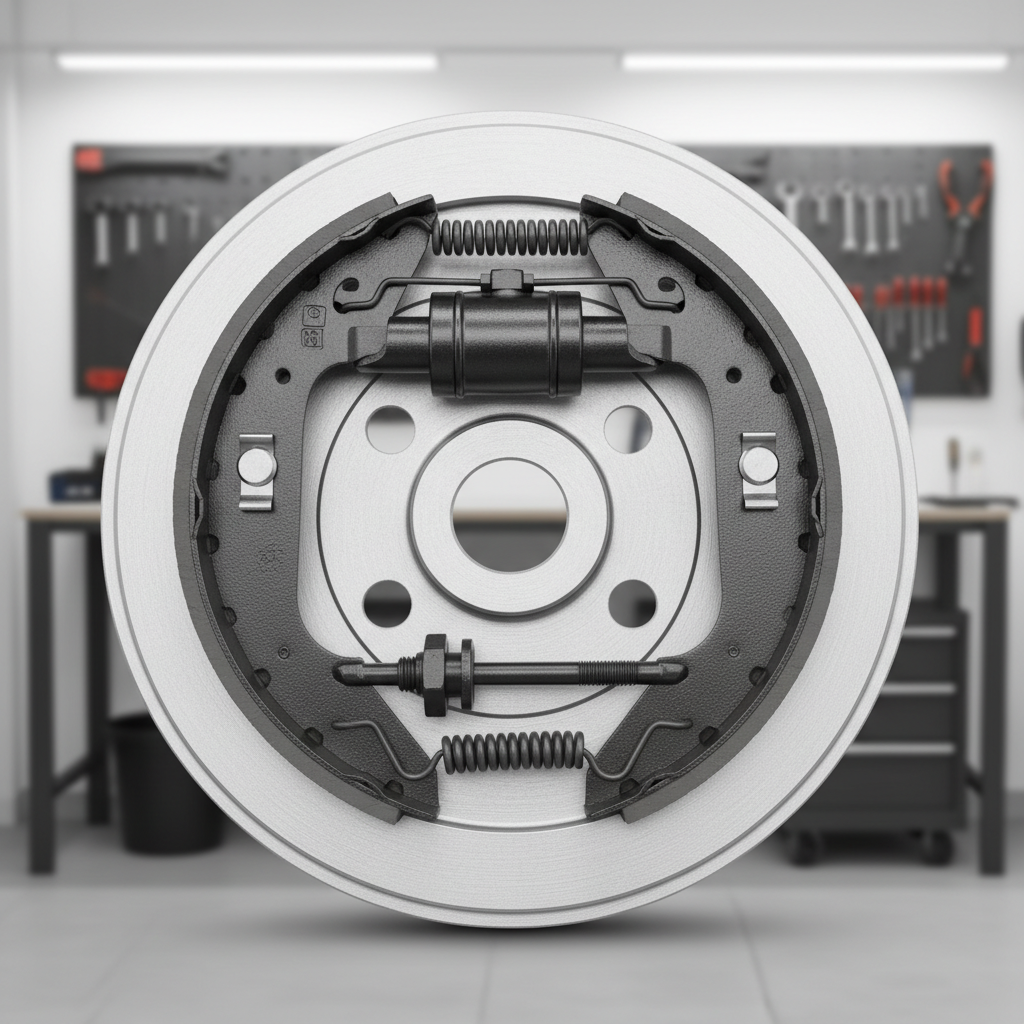
What “rear brake shoes” do, and why they wear out
Rear drum brakes use brake shoes that press outward against the inside of the drum, creating friction that slows the wheel. The parts look simple, but they rely on correct spring tension and adjustment to work consistently.
Rear shoes often wear slowly, so people miss early warning signs, then the pedal starts to feel strange all at once.
- Normal wear: friction material thins down over time, especially with city driving or heavy loads.
- Out-of-adjustment: a self-adjuster that sticks can leave shoes too far from the drum, causing longer pedal travel.
- Contamination: axle seal leaks or wheel cylinder leaks can soak the lining, reducing braking and causing grabbing.
- Hardware fatigue: tired return springs can let shoes drag, building heat and accelerating wear.
According to NHTSA, properly maintaining brakes is part of preventing crashes tied to mechanical issues, and for DIY work that means not skipping inspection steps just to “get it done.”
Quick self-check: do you need shoes, hardware, or more than that?
Before you buy parts, take two minutes to sort your situation, because replacing shoes alone won’t fix a leaking cylinder or a scored drum.
- Squeal or scrape from the rear: may be worn lining or loose hardware, but verify inside the drum.
- Parking brake won’t hold: can be worn shoes, stretched cable, or poor adjustment.
- Brake pedal travel feels longer: commonly adjuster not working, sometimes air in the system if there’s a leak.
- Wet backing plate or damp dust: often points to a wheel cylinder or axle seal leak.
If you already have the drum off, use these visual checks:
- Lining thickness: if it looks thin, cracked, or separating from the shoe, plan on replacement.
- Drum surface: deep grooves, heat spots, or cracking means the drum may need machining or replacement.
- Wheel cylinder boots: any wetness around the rubber boots is a red flag.
Tools, parts, and safety setup (what actually makes this job easier)
The right tools reduce the chance you fight springs for an hour and still install something backward. Here’s the setup most DIYers end up needing.
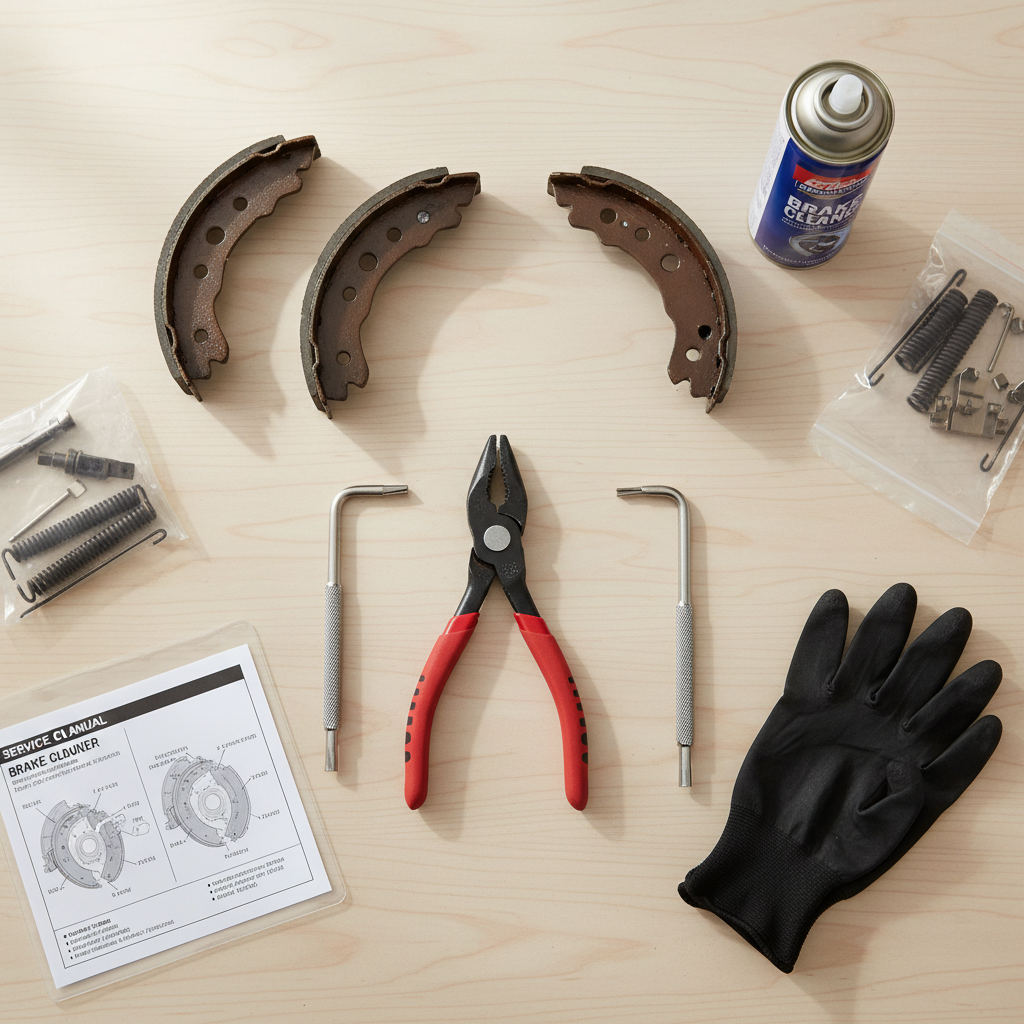
- Jack, jack stands, wheel chocks: never rely on a jack alone.
- Lug wrench, sockets, ratchet
- Brake spring tool or spring pliers, plus a hold-down spring tool
- Brake cleaner and a drain pan/cardboard to catch dust
- High-temp brake grease (very small amount on contact points only)
- New brake shoes and usually a hardware kit (springs, pins, adjuster bits)
- Adjusting spoon for the star wheel adjuster
- Torque wrench for wheels, because “tight enough” varies a lot
Safety note on dust: avoid blowing drum dust with compressed air. According to OSHA, brake dust can contain hazardous materials depending on the brake type and age, so use brake cleaner and wipe carefully, and wear a suitable mask if dust is heavy.
Step-by-step: how to replace rear brake shoes (drum brakes)
This is the core flow for how to replace car brake shoes rear on common drum setups. Details vary by model, so having a repair manual or an accurate diagram for your exact vehicle helps a lot.
1) Secure the car and remove the wheel
- Park on level ground, set the front wheels with chocks.
- Release the parking brake, drum removal usually requires it off.
- Loosen lug nuts slightly, jack up the rear, set on stands, remove the wheel.
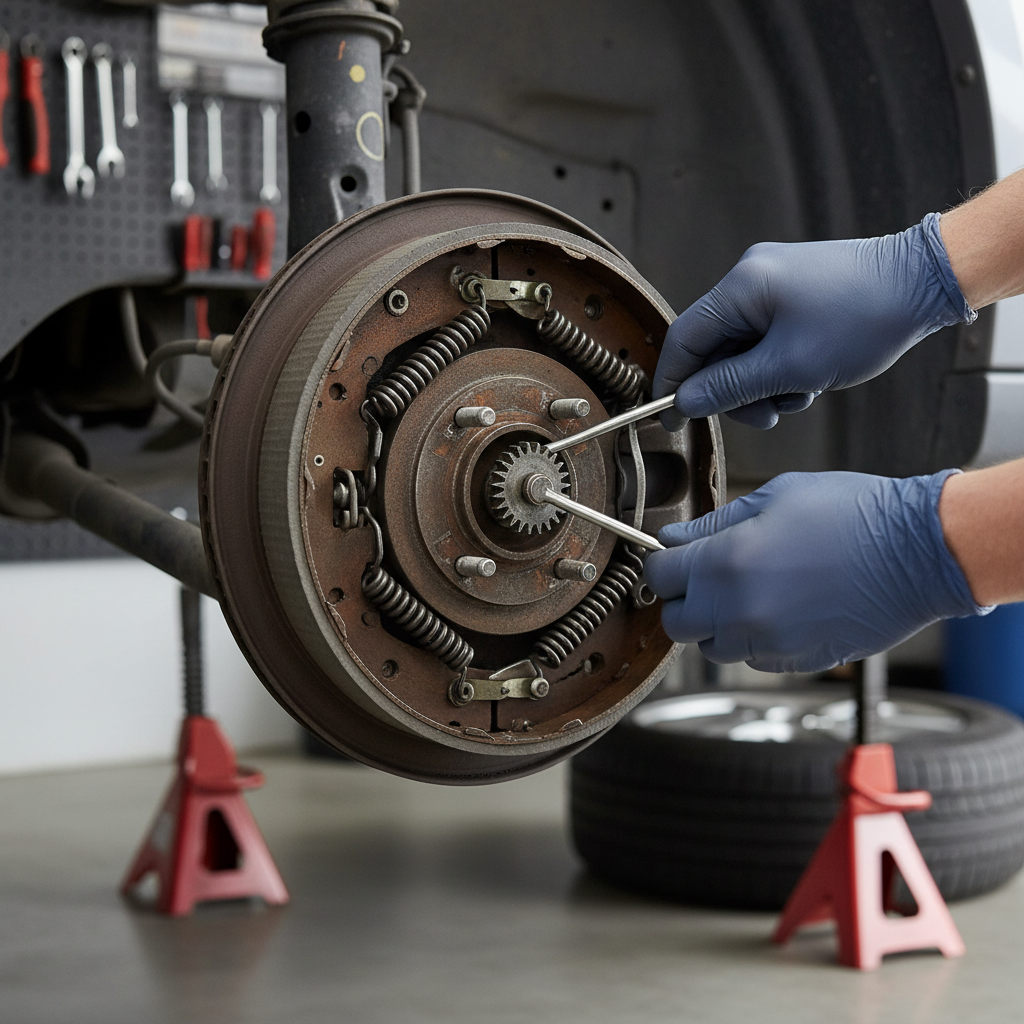
2) Remove the brake drum (without forcing it)
If the drum won’t slide off, it’s often because the shoes are adjusted tight or there’s a ridge inside the drum.
- Look for a rubber plug on the backing plate, remove it, and back off the star wheel adjuster with an adjusting spoon.
- If there are drum retaining screws, remove them.
- Tap the drum face lightly with a rubber mallet, rotate, tap again, then pull.
If it still refuses, stop and reassess, prying aggressively can bend backing plates or crack old drums.
3) Take a “reference photo” before touching springs
This sounds basic, but it’s the difference between a calm install and an hour of guessing. Capture where every spring hooks, and how the adjuster and lever sit.
4) Remove springs and hardware in a controlled order
- Remove hold-down springs/pins that secure the shoes to the backing plate.
- Remove the return springs and any adjuster spring.
- Lift the shoes away, keeping the adjuster parts together.
Tip: lay parts on the floor in the same orientation as installed, left-to-right, so you can “rebuild the picture.”
5) Inspect wheel cylinder, backing plate pads, and adjuster
- Wheel cylinder: any seepage suggests replacement, and you may need to bleed the brakes after.
- Backing plate shoe pads: these are the raised contact points where shoes rub, clean them and add a tiny dab of high-temp brake grease.
- Star wheel adjuster: clean threads, ensure it turns smoothly, apply a small amount of appropriate lubricant on threads only.
6) Install new shoes and (ideally) new hardware
Many techs replace springs with shoes because springs lose tension with heat cycles, and old hardware can create noise or dragging.
- Position the shoes correctly: primary/secondary shoes may differ, and their placement matters for braking behavior.
- Reinstall hold-down pins/springs to anchor shoes.
- Install adjuster and parking brake lever components as your reference shows.
- Install return springs with the proper tool, keeping hands clear if a spring snaps loose.
7) Pre-adjust shoes so the drum fits with light drag
This is where many DIY jobs go wrong. Too tight and the brakes overheat, too loose and the pedal feels long.
- Turn the star wheel so the drum slides on, then adjust until you feel a light, even rub when spinning by hand.
- Repeat on the other side, aim for similar drag left vs right.
8) Reinstall drum and wheel, then torque properly
- Clean the drum inner surface with brake cleaner, let it dry.
- Install drum fully seated.
- Install wheel, hand-tighten, lower to ground, torque lug nuts to spec in a star pattern.
Table: common symptoms after replacing shoes, and what they usually mean
If you’re doing how to replace car brake shoes rear and something feels off after, don’t guess, match the symptom to likely causes and re-check your work.
| Symptom | Likely cause | What to check |
|---|---|---|
| Grinding or scraping noise | Drum damage, wrong assembly, debris | Drum inner surface, shoe seating, missing hardware |
| Brake pull to one side | Uneven adjustment, contamination, stuck cylinder | Star wheel setting both sides, wheel cylinder movement, wet lining |
| Soft pedal or long travel | Under-adjusted shoes, air from a leak | Adjustment through access hole, inspect for fluid, bleed if needed |
| Rear wheels hot after a short drive | Over-adjusted shoes, weak return springs | Back off adjuster slightly, confirm springs and parking brake release |
| Parking brake weak | Cable stretch, misrouted lever, poor adjustment | Lever position, cable routing, shoe adjustment, cable adjustment spec |
Practical tips that keep the job from turning into a redo
A few small choices tend to separate a clean weekend job from an annoying comeback.
- Do one side at a time: leave the other side assembled as a visual guide.
- Replace hardware if it looks tired: stretched springs, rust, and grooves in hold-down pins often cause noise and drag.
- Grease only the right spots: backing plate shoe pads and adjuster threads, never the lining or drum surface.
- Check the self-adjuster orientation: many are side-specific, swapping sides can prevent proper adjustment.
- Bed in gently: a few moderate stops helps surfaces mate, but avoid hard braking for the first miles if possible.
Common mistakes (and why they matter)
Most “rear shoes don’t work” stories come from the same handful of issues, not from bad parts.
- Mixing up primary vs secondary shoe: can cause odd braking feel and weak parking brake.
- Installing springs in the wrong holes: changes tension, leads to dragging or uneven wear.
- Skipping drum inspection: a heavily grooved drum can eat new shoes quickly.
- Ignoring a leaking wheel cylinder: fluid-soaked lining can grab or fade, and it rarely “dries out” into safe braking.
- Not adjusting before driving: relying on self-adjusters alone often creates long pedal travel.
When to stop and get professional help
DIY can be a good fit, but some conditions raise the risk or time cost fast.
- Brake fluid leak at the wheel cylinder or line, especially if the reservoir drops.
- Seized adjuster or hardware that breaks during removal, leaving you without correct spring tension.
- ABS concerns or warning lights after reassembly, which may require scan tools and proper diagnosis.
- Heavy rust on backing plate where shoe contact pads are damaged, which can prevent smooth shoe return.
If you’re unsure, a brake shop can confirm assembly and adjustment quickly, and in many cases that’s cheaper than burning up a new set of shoes and drums.
Key takeaways and next steps
If you approach how to replace car brake shoes rear with a clean workspace, a reference photo, and careful adjustment, the job becomes predictable instead of stressful. Focus on three things: correct part placement, healthy hardware, and a final shoe adjustment that gives light drag without heat.
Your next step is simple: inspect both sides, order shoes plus a hardware kit if yours looks aged, then plan enough time to do one side carefully and match the other. After the install, do a cautious test drive close to home and re-check for heat or unusual noise.
FAQ
How long does it take to replace rear brake shoes at home?
Many first-timers take 2–4 hours for both sides, mostly because spring routing and adjustment take patience. Once you’ve done it once, it often goes faster, but rust can change everything.
Do I need to replace drums when I replace brake shoes?
Not always. If the drum inner surface looks smooth and measures within spec, it may be reusable, but deep grooves, cracking, or heavy heat spots usually mean resurfacing or replacement makes more sense.
Should I replace the hardware kit with the shoes?
In many cases, yes. Springs and hold-down parts are cheap compared with redoing the job, and weak springs can cause dragging or noise even with new shoes.
Why is the brake pedal still low after replacing rear shoes?
The most common cause is under-adjustment, the shoes sit too far from the drum so the wheel cylinder has to travel more. If there’s any sign of fluid leakage, treat it as a separate issue and consider professional diagnosis.
Can I do this job without a brake spring tool?
It’s possible, but it’s usually frustrating and increases the chance a spring slips. A basic spring tool set tends to pay for itself on drum brake jobs.
How do I know if the wheel cylinder is bad?
Look for wetness around the rubber boots or fluid trails on the backing plate. Even slight seepage can contaminate the new lining, so many DIYers replace cylinders if there’s any doubt.
What if the drum won’t come off even after backing off the adjuster?
Rust bonding or a heavy inner ridge can hold it on. Penetrating oil around the hub area and gentle tapping can help, but if you have to force it hard, it’s a sign to slow down and consider a shop to avoid bending parts.
Do I need to bleed brakes after replacing rear brake shoes?
Usually no, because you’re not opening the hydraulic system. If you replace wheel cylinders or disturb brake lines, bleeding becomes necessary and should be done carefully to avoid air in the system.
If you’re replacing rear drum brakes because the car started squealing, the pedal feels longer, or the parking brake stopped holding, and you want a more predictable outcome, it can help to follow a vehicle-specific diagram and use a complete shoe-and-hardware kit so you’re not mixing tired springs with new friction material.